Setup linux test client: Difference between revisions
Jump to navigation
Jump to search
(Created page with " =System settings for the loop back adapter= Edit '''/etc/sysctl.conf''' and add: net.ipv4.conf.eth0.arp_ignore = 1 net.ipv4.conf.eth0.arp_announce = 2 net.ipv4.conf.all.a...") |
|||
| (22 intermediate revisions by the same user not shown) | |||
| Line 1: | Line 1: | ||
= | {| width="50%" <-- Test !--> | ||
| valign="top" | | |||
Linux Test setup, it has been tested on | |||
*Debian 8 | |||
*Apache 2.4 | |||
*Hostname used for the test: '''myLVS-LinuxClient''' | |||
| valign="top" | | |||
[[File:myLVS-HL-Linux.png|240px]]<br><br> | |||
|} | |||
=System settings to configure the loop back adapter= | |||
To make the change permanent you may edit '''/etc/sysctl.conf''' and add: | |||
net.ipv4.conf.eth0.arp_ignore = 1 | net.ipv4.conf.eth0.arp_ignore = 1 | ||
net.ipv4.conf.eth0.arp_announce = 2 | net.ipv4.conf.eth0.arp_announce = 2 | ||
| Line 8: | Line 19: | ||
net.ipv4.conf.all.arp_announce = 2 | net.ipv4.conf.all.arp_announce = 2 | ||
Apply: | |||
sysctl -p | |||
To make it applied immediately you can set: | |||
root@myLVS-LinuxClient:~# '''echo "1" > /proc/sys/net/ipv4/conf/eth0/arp_ignore''' | |||
root@myLVS-LinuxClient:~# '''echo "2" > /proc/sys/net/ipv4/conf/eth0/arp_announce''' | |||
root@myLVS-LinuxClient:~# '''echo "1" > /proc/sys/net/ipv4/conf/all/arp_ignore''' | |||
root@myLVS-LinuxClient:~# '''echo "2" > /proc/sys/net/ipv4/conf/all/arp_announce''' | |||
'''Note: If the ifconfig command is missing then install it by using:''' | |||
# apt-get install net-tools | |||
Add to '''/etc/rc.local''' to automatic load the loop back adapter: | Add to '''/etc/rc.local''' to automatic load the loop back adapter: | ||
/sbin/ifconfig lo:0 192.168.2.220 -arp netmask 255.255.255.255 up | /sbin/ifconfig lo:0 192.168.2.220 -arp netmask 255.255.255.255 up | ||
ifconfig should look like: | |||
root@myLVS-LinuxClient:~# ifconfig | |||
eth0 Link encap:Ethernet HWaddr 08:00:27:89:f3:8d | |||
inet addr:192.168.2.222 Bcast:255.255.255.255 Mask:255.255.255.0 | |||
inet6 addr: fe80::a00:27ff:fe89:f38d/64 Scope:Link | |||
UP BROADCAST RUNNING MULTICAST MTU:1500 Metric:1 | |||
RX packets:1646 errors:0 dropped:2 overruns:0 frame:0 | |||
TX packets:356 errors:0 dropped:0 overruns:0 carrier:0 | |||
collisions:0 txqueuelen:1000 | |||
RX bytes:153233 (149.6 KiB) TX bytes:105801 (103.3 KiB) | |||
lo Link encap:Local Loopback | |||
inet addr:127.0.0.1 Mask:255.0.0.0 | |||
inet6 addr: ::1/128 Scope:Host | |||
UP LOOPBACK RUNNING MTU:65536 Metric:1 | |||
RX packets:32 errors:0 dropped:0 overruns:0 frame:0 | |||
TX packets:32 errors:0 dropped:0 overruns:0 carrier:0 | |||
collisions:0 txqueuelen:0 | |||
RX bytes:1920 (1.8 KiB) TX bytes:1920 (1.8 KiB) | |||
lo:0 Link encap:Local Loopback | |||
inet addr:'''192.168.2.220''' Mask:'''255.255.255.255''' | |||
UP LOOPBACK RUNNING MTU:65536 Metric:1 | |||
=Testing the loop back adapter= | |||
<br>Switch off the first (Windows) client to make Linux as the only web server<br> | |||
[[File:04-02-01-myLVSOff.png|640px]]<br><br> | |||
<br>The new myLVS overview should now show the disabled (Windows) server marked with a red cross:<br> | |||
[[File:04-02-02-myLVS02on.png|640px]]<br><br> | |||
Use a network client and open the URL http://192.168.2.220, we should now see the result of '''web02''' (because web01 is off)<br> | |||
There should be the Linux/Debian default web page<br> | |||
[[File:04-01-01-DebianDefWeb.png|640px]]<br><br> | |||
=Where to go next= | |||
[[ | <br> | ||
*Go here: [[Setup summary]] | |||
Latest revision as of 08:39, 5 August 2020
|
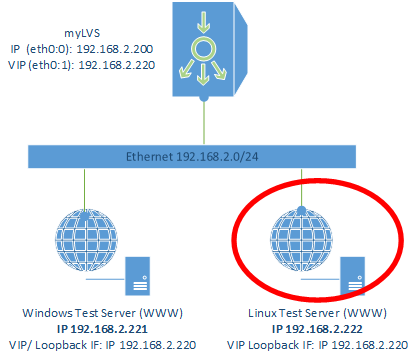
Linux Test setup, it has been tested on
|
System settings to configure the loop back adapter
To make the change permanent you may edit /etc/sysctl.conf and add:
net.ipv4.conf.eth0.arp_ignore = 1
net.ipv4.conf.eth0.arp_announce = 2
net.ipv4.conf.all.arp_ignore = 1
net.ipv4.conf.all.arp_announce = 2
Apply:
sysctl -p
To make it applied immediately you can set:
root@myLVS-LinuxClient:~# echo "1" > /proc/sys/net/ipv4/conf/eth0/arp_ignore
root@myLVS-LinuxClient:~# echo "2" > /proc/sys/net/ipv4/conf/eth0/arp_announce
root@myLVS-LinuxClient:~# echo "1" > /proc/sys/net/ipv4/conf/all/arp_ignore
root@myLVS-LinuxClient:~# echo "2" > /proc/sys/net/ipv4/conf/all/arp_announce
Note: If the ifconfig command is missing then install it by using:
# apt-get install net-tools
Add to /etc/rc.local to automatic load the loop back adapter:
/sbin/ifconfig lo:0 192.168.2.220 -arp netmask 255.255.255.255 up
ifconfig should look like:
root@myLVS-LinuxClient:~# ifconfig
eth0     Link encap:Ethernet  HWaddr 08:00:27:89:f3:8d
         inet addr:192.168.2.222  Bcast:255.255.255.255  Mask:255.255.255.0
         inet6 addr: fe80::a00:27ff:fe89:f38d/64 Scope:Link
         UP BROADCAST RUNNING MULTICAST  MTU:1500  Metric:1
         RX packets:1646 errors:0 dropped:2 overruns:0 frame:0
         TX packets:356 errors:0 dropped:0 overruns:0 carrier:0
         collisions:0 txqueuelen:1000
         RX bytes:153233 (149.6 KiB)  TX bytes:105801 (103.3 KiB)
lo       Link encap:Local Loopback
         inet addr:127.0.0.1  Mask:255.0.0.0
         inet6 addr: ::1/128 Scope:Host
         UP LOOPBACK RUNNING  MTU:65536  Metric:1
         RX packets:32 errors:0 dropped:0 overruns:0 frame:0
         TX packets:32 errors:0 dropped:0 overruns:0 carrier:0
         collisions:0 txqueuelen:0
         RX bytes:1920 (1.8 KiB)  TX bytes:1920 (1.8 KiB)
lo:0     Link encap:Local Loopback
         inet addr:192.168.2.220  Mask:255.255.255.255
         UP LOOPBACK RUNNING  MTU:65536  Metric:1
Testing the loop back adapter
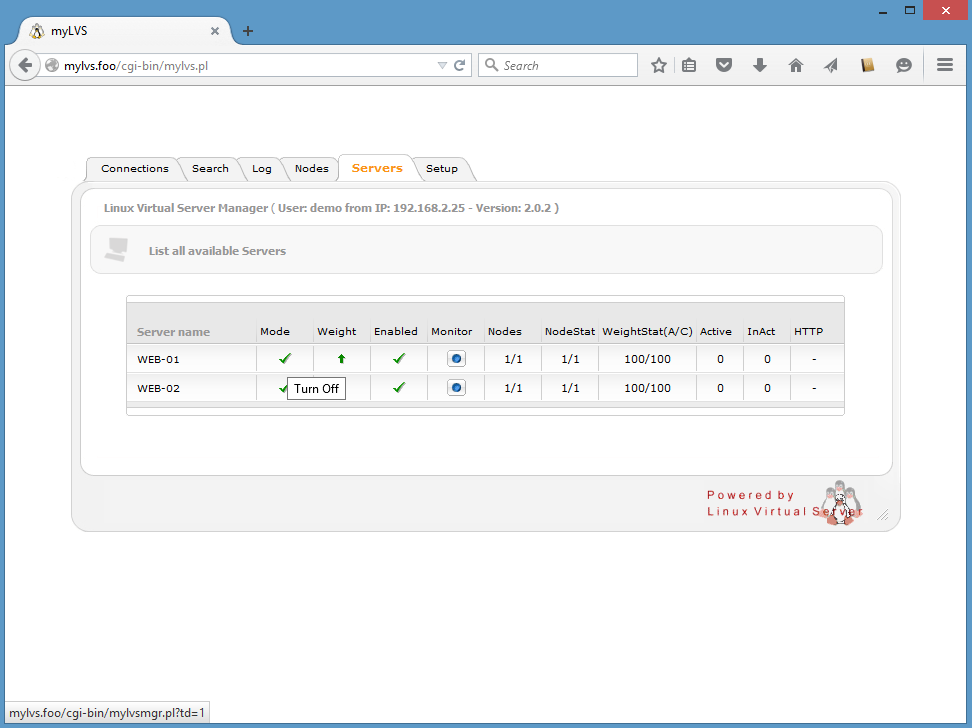
Switch off the first (Windows) client to make Linux as the only web server

The new myLVS overview should now show the disabled (Windows) server marked with a red cross:

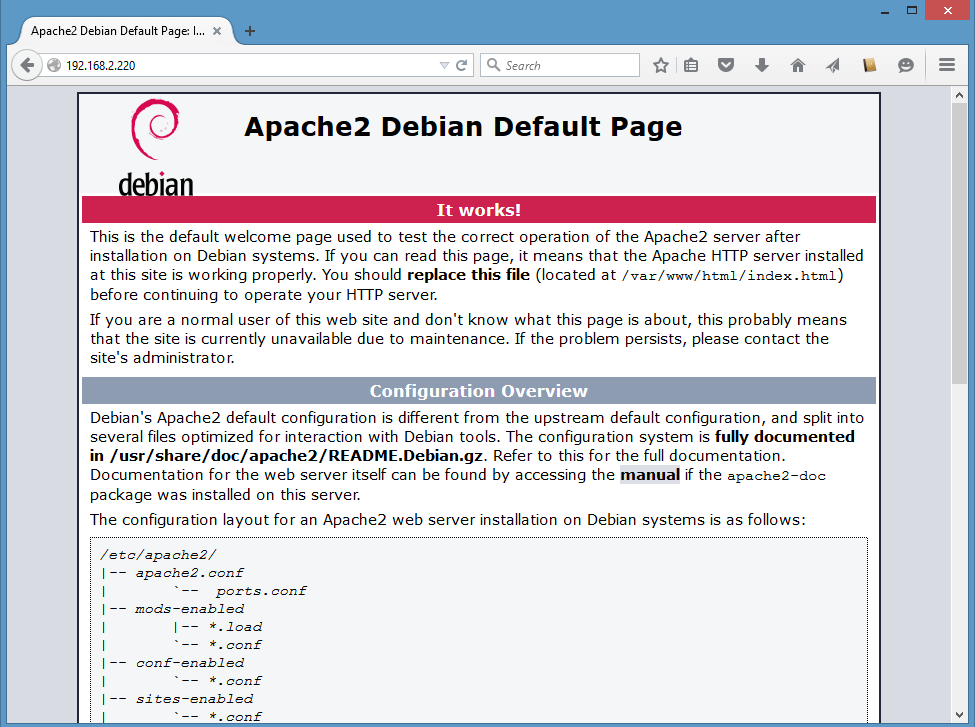
Use a network client and open the URL http://192.168.2.220, we should now see the result of web02 (because web01 is off)
There should be the Linux/Debian default web page

Where to go next
- Go here: Setup summary
