Setup Remote Access: Difference between revisions
Jump to navigation
Jump to search
| Line 9: | Line 9: | ||
*Check to see if the plugin runs without any error, run: | *Check to see if the plugin runs without any error, run: | ||
root@mylvs01:/# '''/usr/lib/nagios/plugins/check_nrpe''' | root@mylvs01:/# '''/usr/lib/nagios/plugins/check_nrpe''' | ||
==Setup the Linux | ==Setup the Linux Realserver with the NSClient (the server part)== | ||
Remember: The Realserver on Linux acts as server in the view of nrpe | Remember: The Realserver on Linux acts as server in the view of nrpe | ||
*Install NSClient Server part to the myLVS client | *Install NSClient Server part to the myLVS client | ||
Revision as of 19:23, 3 September 2015
myLVS is using the NSClient solution to communicate from the myLVS server to the nsclient service
running on the RealServer. myLVS supports both, the NSClient version which comes with Debian Linux
and the Windows version which comes with http://nsclient.org
Setup myLVS with the NSClient (the client part)
Remember: myLVS acts as client in the view of nrpe
- On Debian run the installation command if not already done
root@mylvs01:/# apt-get install nagios-nrpe-plugin -s
- Check to see if the plugin runs without any error, run:
root@mylvs01:/# /usr/lib/nagios/plugins/check_nrpe
Setup the Linux Realserver with the NSClient (the server part)
Remember: The Realserver on Linux acts as server in the view of nrpe
- Install NSClient Server part to the myLVS client
root@myLVS-LinuxClient:~# apt-get install nagios-nrpe-server
- Run sudo
root@mylvs01:/# visudo -f /etc/sudoers
- Add to sudo
nagios ALL=NOPASSWD: /sbin/ipvsadm
nagios ALL=NOPASSWD: /sbin/init
Edit /etc/nagios/nrpe.cfg
- Set Allowed hosts
allowed_hosts=127.0.0.1 192.168.2.100
- Set dont blame
dont_blame_nrpe=1
- Set two new commands, restart web and reboot
command[reset_apache]=/etc/init.d/apache2 restart
command[reboot]=init 6
- Restart the nrpe server
root@myLVS-LinuxClient:~# /etc/init.d/nagios-nrpe-server restart
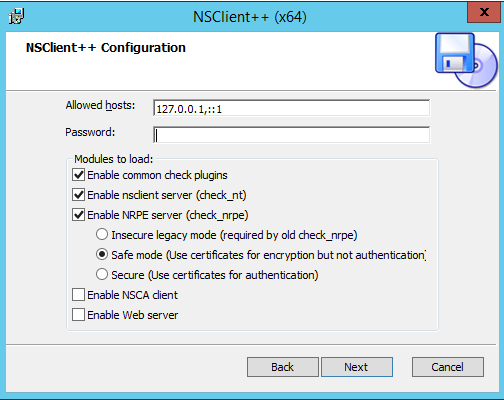
Setup the Windows server with the NSClient (the server part)
Remember: Windows acts as server in the view of nrpe
- Get the Windows client here: http://www.nsclient.org/download
- Install the client, the settings are not that important, just remove the password.

Edit C:\Program Files\NSClient++\nsclient++.ini
- Add to allowed hosts
allowed hosts = 127.0.0.1,::1,192.168.2.100
- SSL options needed for the classic npe client, worst case is to allow only:
ssl options = sslv2,sslv3
- Verify off
verify mode = none
- Insecure true
insecure = true
- Add commands:
[/settings/external scripts/scripts]
reset_iis="C:\Program Files\NSClient++\scripts\resetiis.bat"
reboot="C:\Program Files\NSClient++\scripts\reboot.bat"
Add two new batch files
- C:\Program Files\NSClient++\scripts\reset_iis.bat
iisreset
- C:\Program Files\NSClient++\scripts\reboot.bat
shutdown /r /f
Don't forget to restart the nrpe++ services when changes are made
Testing the myLVS access
- Reset the IIS service on Windows
root@mylvs01:/home/demo# /usr/lib/nagios/plugins/check_nrpe -H 192.168.2.221 -p 5666 -c reset_iis
- Reset the Apache on Linux
root@mylvs01:/home/demo# /usr/lib/nagios/plugins/check_nrpe -H 192.168.2.222 -p 5666 -c reset_apache
- Reboot Windows
root@mylvs01:/home/demo# /usr/lib/nagios/plugins/check_nrpe -H 192.168.2.221 -p 5666 -c reboot
- Reboot Linux
root@mylvs01:/home/demo# /usr/lib/nagios/plugins/check_nrpe -H 192.168.2.222 -p 5666 -c reboot